Tag Archives: Design Process

Experiencing Virtual Reality (HTC Vive)

So recently we were lucky enough to get a HTC Vive (Steam VR) in our studio; and I must admit, the experience is amazing. I’ve mostly had experience in the design program Tilt Brush, which for fast, easy designs that can be made to scale, it’s amazing. VR as a design tool can be developed to become something incredible, and I hope it gets a much wider adoption in the digital art community.

I’ve also had a couple of experiences in the gameplay possibilities of VR, the immersion is unbelievable, whilst playing you really get invested in the environments and the interactions you have in each one. However, with this kind of physical immersion comes the physicality of the gameplay; whereas with a normal game the worst injury a player can get is carpal tunnel, in VR the amount of physical exertion required to play the games means that players will most likely have to warm-up and stretch before playing for a long duration of time. If VR can become more accessible to more people then I believe we can truly have an amazing development in technological capabilities, and a definite increase in quality products/design pieces.

We just have to be careful not to end up in a situation like The Matrix!

3D Practice

Today I’ve been having a chill day before the last big push to finishing my second year of uni. So I decided to do a bit of modelling (because I can’t relax anymore without being creative) and modelled Obi-Wan Kenobi’s Lightsaber from Episode 1: The Phantom Menace.

You can fine the model HERE. (for some reason embedding doesn’t work)

Non-Disclosure Agreement (NDA)

A Non-Disclosure Agreement (NDA) is a legal document between two or more parties outlining the disclosure of sensitive, confidential or otherwise copy-written material to stay between the participants and to not be released to the public or other parties.

In terms of using an NDA for our course projects these would only become applicable if we were to use outside sources for aid in production; for example, if we were to hire external participants like voice actors, programmers, musicians and other artists/creatives then we  would have to make them sign a NDA.

Having the involved parties sign this document basically makes either side liable for any leak of information that is otherwise considered sensitive; so essentially it’s a safety net for the creatives in charge of the project.

Finishing the Heritage Project

Sunday 15th May 2016:

The Heritage Project was in a very unfinished state; due for public showing the following day myself, 2 fellow students and our tutor all met up to give the project one last push and have it in a somewhat finished state for the following day.

I showed up a little later than everyone else did, but as soon as I was set-up I was on my way with helping to make (in my opinion) a mini miracle. Firstly  was set with fixing any models that were broken, inaccurate, or didn’t quite look right.

After this I had to leave for a few hours, but everyone else worked away and managed to get some more done. When I got back I carried on working through the list of things to do; when that list was done the other 2 students went home because they were tired, but me and my tutor stayed and made a new list of everything that still needed doing. Working through this new list I was actually surprised with how quickly we worked through it. I also learned a new way of modelling for specific situations; spline modelling, I never thought of modelling that way but it was surprisingly effective, more so than normal polygon modelling.

By this point it was the early hours of Monday morning, the day the project was going to the public.

Monday 16th May:

Early in the morning, myself and my tutor are hard at work making the project look presentable; doing any means necessary to fill in missing buildings, fix broken ones and add anything that is needed. By 3am we had finished making everything look presentable, and started working on directing the video. For 2 1/2 hours we toiled over different camera angles, panning speeds and focal points. Finally we were happy with the end product, and the reactions from everyone else when showing it seemed similar. However, before we got that far we had some new issues arise; parts of the final render had corrupted so we had to trawl through the footage to find the few frames that were broken and remove them. Because of this we missed the start of our public presentation, meaning we had to push it back by 1 1/2 hours until we had fixed everything. Once everything was sorted myself, and my two tutors, took it down to the library where it was being shown.

Verdict:

The public loved our presentation and seemed very interested in the history behind the project. As a result, we now have an offer of having the project being shown in 2017 for the City of Culture event that is happening in Hull.

Trying To Advance My Skills

Over the year I have slowly been learning how I can make my work better. At the start of this year my skills were not anywhere near the level that they should have been; I didn’t realise this until the half term of the first semester of this year, when it was pointed out to me that my workflow was very wrong. From there I have been taking on board advice from everyone and anyone I can, bettering myself in the hopes that one day I can make beautiful works of art as easily as I breathe, walk and talk.

If I were to show some of the work that I made at the end of last year (which incidentally is slightly better than what I was making at the start of this year), there is a very distinguishable difference in quality. So to prove my point, below is a building I modelled and textured towards the end of my first year:

It was unwrapped entirely by using the flatten map tool and had around 12 subdivisions (possibly more, I can’t quite remember), and all of the textures were very crudely thrown over a UV map in Photoshop. And from the images you can clearly see that it’s just awful, I actually feel kinda ill looking at it again…

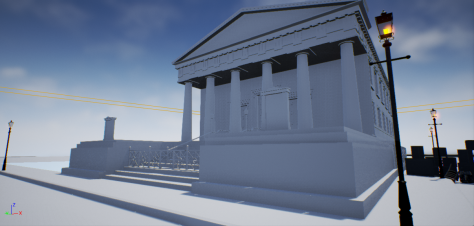
Now on to how I’ve developed my skills to where I am now. One of the models I’m going to show has been produced all throughout the year and shows different stages of my progression. I’ll show that model first:

HighresScreenshot00001

Now this model is still very far from being perfect, and there are things that I would do better. But this model shows perfectly how far my skills have come; there is more attention to detail, not only in modelling but to texturing as well. There is an obvious difference in the quality of my production. In fact, at one point I started this model again because I messed it up.

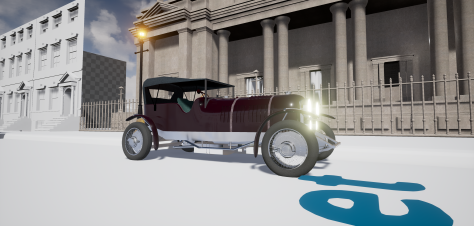
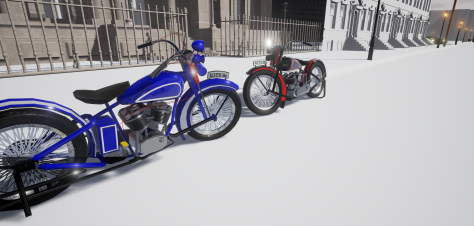
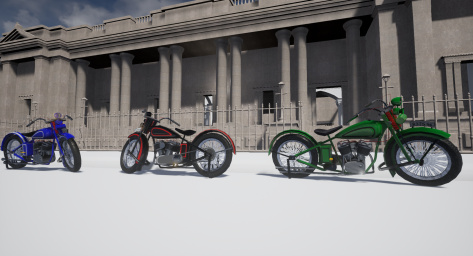
Now below are some more objects I created, one is a car (based on the Bentley 4) and the other is a motorcycle (based on the Harley Davidson model 74). Had I tried to make these at the start of the year (when I originally planned to) they wouldn’t be anywhere near as good as what they are now; again they’re not perfect, I know there are issues with them, and there is still a lot of improvement to be made.

HighresScreenshot00023

HighresScreenshot00026

ScreenShot00020

Over the summer period I fully intend on improving my skills further in preparation for my Final Major Project.

Learning how to utilise a PBR workflow

Since just before Christmas I started learning about Physical Based Rendering and the workflows required to achieve it. My learning of PBR started when my tutor Paul did a lecture on creating basic PBR materials for Unreal Engine 4; from there I started looking into the theory behind the workflow, looking at documentation from companies such as Marmoset and Allegorithmic who have both released free documentation outlining the workflows and maths behind PBR. There are links to those documents below:

Marmoset:

Theory

Practice

Conversion

Allegorithmic

Now my texturing workflow is almost exclusively PBR, and even though my production of PBR materials is still somewhat basic, I can safely say that I understand enough of the theory behind it to make something that looks decent PBR wise (I feel my actual texturing could still use some work).

Obviously there is a lot more I can learn, and I plan to keep upskilling over the summer period so that I will be better for next years projects.

Game Jam Work

Over this year I have had the opportunities to participate in 2 game jams. The first was held in Cambridge over the summer break; the second was held by my tutor for our course privately, over the half term break of the first semester.

The Cambridge game jam was a fun experience, however I wasn’t really pushed out of my comfort zone. Even though my skills weren’t as good as they are now, I still didn’t feel pushed by the project, or my team, so I didn’t realise that my skills weren’t up to scratch. The whole experience was fun, and I got the chance to speak to industry professionals which helped give me an insight into the career path I want to take. For the next game jam that I will be attending (which coincidentally is at Cambridge again, in June of this year) my skills will be considerably higher, so I hope to make a bigger contribution to the team.

The second game jam was where I realised that my skills weren’t where they should be, thankfully I found this out at the start of my second year rather than at the end of my third, so I at least had the time to up-skill. Which I have. That experience opened my eyes to how much work this career will involve, and since then I’ve been working hard to make sure I’m industry ready. Yes it has been hard, and yes there have been moments when I wanted to give up and go home; but looking at what I can do now compared to what I could do at the start of the year, I wouldn’t have it any other way and honestly I loved every minute of it.

Hopefully the next game jam will help me to learn more.

Client Work

So over the space of this year I have had the opportunity to work with 3 different clients on projects outside of the big heritage one that I have been working on all year.

The first project was for Dave Eccles (a tutor at my uni), the project involved me recreating Dave’s classroom in 3D to show how he wants it to eventually look. While doing this project I didn’t really come across any challenges, after all it was just a modelling job and was completed in the time frame of 3-4 hours. I had to measure out the room with a measuring tape and get accurate measurements so I could model the room realistically. The below images are renders of the model.

The second project, which was completed on the day this post was written (9th may 2016) is the Noah, A Mystery Play project. I have already posted about the project which you can find HERE. Overall the project took roughly 8-10 hours (I didn’t really keep count); I had a couple of issues texturing the model, but I managed to overcome them and I’m happy with the final result. There will be a video soon showing the final product.

The final client project was for Matthew Hewitt (another tutor at my uni). The project involved something similar to the first project;  I was tasked with modelling out a room. This time however it was to show how a photography exhibition was to be laid out in a gallery space. The measurements I was given to help model the room weren’t accurate so I had to do a lot of modelling by eye; but it turned out decent and the client was happy with it, so no problems there. Below are some renders of the project.

While working on these projects I have had to meet with the clients themselves to discuss what was required, when it was due for, and how they wanted it to be made. All of them were satisfied with the work I had produced.

Game Theory – Mirrors Edge

Here is the final game review where myself and my friend talk about what makes specific games “addictive” and “fun”. This video is a review of Mirrors Edge and some of the theories and gameplay elements that are used behind the scenes. This video was written and recorded by myself, my friend is featured to add a dialogue to make the video more interesting.